Internal Libreboot Flashing Guide
Once you have already flashed libreboot/coreboot on your machine you will have access to your ROM from your operating system. This means that you can easily flash/reflash your firmware without having to take your machine apart again. This guide will explain the process for how to internally flash from a machine that already has libreboot/coreboot.
Note: there is nothing fundamentally different about internal vs external flashing. In both cases, you are rewriting the entire ROM of your bios chip. This is important if you are updating a computer with libreboot/coreboot already installed. You have to remember that although you are “updating” the system, you are undertaking the same process with the same risks as the initial flash. That being said, the risks are often overstated. I have flashed many machines multiple times internally and externally and never bricked a device. Proceed at your own risk.
Preparing the Host Machine
Now that you have all the necessary software you still probably cannot flash your ROM. Linux kernel since 4.4 will block access to ROM as a security measure, so running flashrom will show and error like ‘/dev/mem mmap failed.’ To get around this, you need to tell the kernel to allow access to low level hardware at boot time.
You can easily set kernel parameters from grub, which generally only requires a simple reboot. On some librebooted machines, the grub payload will launch your operating system without ever prompting you with a kernel menu (generally the case with trisquel). Sometimes, you can prompt a menu list by hitting the shift key over and over during boot. You can edit kernel parameters from the initial libreboot-grub menu but it is complex. I recommend preparing a bootable usb with your favourite linux distro and editing the menu from there if you can’t get to your grub menu by rebooting.
Note: if you do boot from a usb to flash, you’ll need to follow this guide within your live environment. If you don’t want to do the entire thing in one sitting then you should set up persistent storage on your usb device.
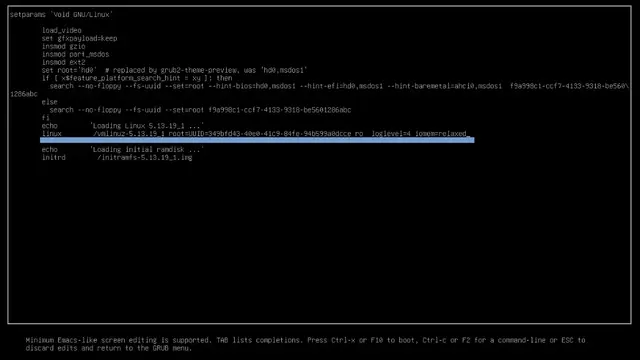
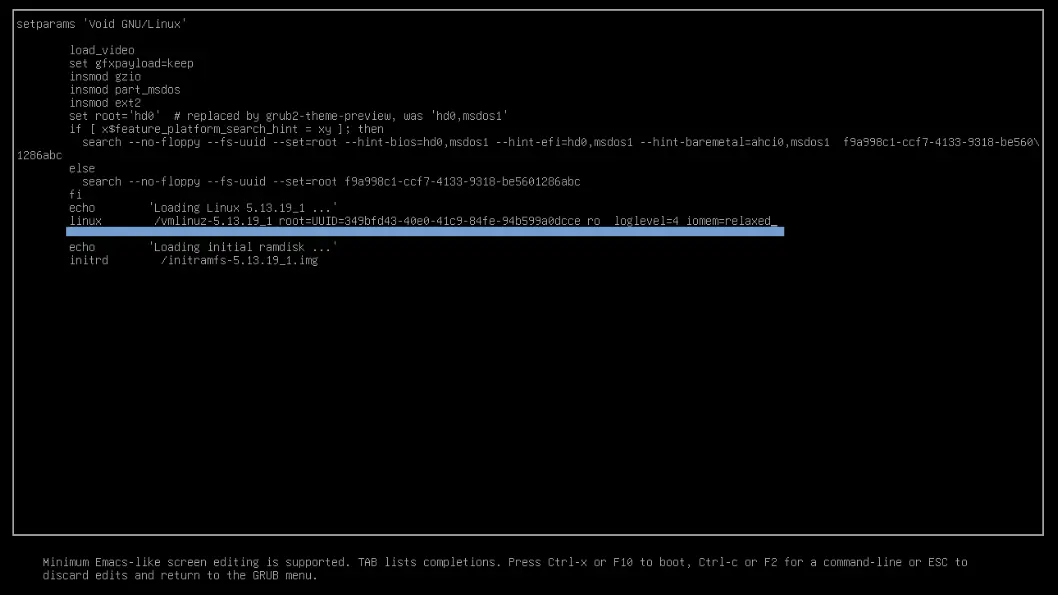
When you get to your grub menu, you can edit the default menu entry by pressing ‘e.’ Use the arrow keys to navigate down to the line starting with ‘linux’ and add ‘iomem=relaxed’ to the end of the line.
Getting the Software
You’ll need several utilities installed on your system to be able to flash a rom. You will also -obviously- need the rom itself. The rest of this guides assumes that you are operating from a directory called ‘libreboot’ in your home directory.
 cd ~
 mkdir libreboot
You can likely install flashrom from your distro’s repos. If you can’t install flashrom with your package manager, then install it along with ich9gen from the archive you’ll download in step 1.
You should also set up a local directory in your path. Doing this makes it easy to run binaries/scripts without installation/superuser privileges. Simply create the directory and add it to your PATH.
 mkdir -p ~/.local/bin
 echo "PATH=$PATH:$HOME/.local/bin" >> .bashrc
Step 1 Download, extract, and move the ich9gen binary into your PATH. You can also use several other utilities from the same archive, so you may as well leave it intact. Note that the archive you’ll download has binary for several different architectures, so set ‘arch’ to your host machine’s architecture.
 cd ~/libreboot
 wget 'https://rsync.libreboot.org/stable/20160907/libreboot_r20160907_util.tar.xz'
 mkdir util
 arch="x86_64"
 tar xvf libreboot_r20160907_util.tar.xz -C util
 mv util/libreboot_r20160907_util/ich9deblob/$arch/ich9gen ~/.local/bin
 chmod +x ~/.local/bin/*
Step1A: If you’re going to be flashing an x200 you should download the hackrom utility. Hackrom is a patched version of flashrom that allows you to use the ‘–workaround-mx’ flag.
 wget 'https://vimuser.org/hackrom.tar.xz'
 mv hackrom/flashrom ~/.local/bin/hackrom
Step 2: You can flash any rom you want with the utilities you now have installed. This guide assumes you’re using the libreboot builds from my github, by you can use any coreboot/libreboot/osboot build you want. Using my builds will greatly simplify the process going forward and also adds some important fixes to the roms themselves. Replace the download link with the latest release from the github releases. Make sure to get the “all” archive if you want more than just the usqwerty layout.
mkdir ~/libreboot/roms
cd ~/libreboot/
wget LATEST_RELEASE
tar xvf custom-all.tar.gz -C roms
Flashing
I wrote a simple script which you can download and run to flash the chip. You’ll need to know the chip name and mac address for the machine you want to flash. You can find the chip name written on top of the chip, use a magnifying glass or your phone’s camera to get a better look at the chip. You may have to remove a small piece of tape on top of the chip to read it. If you can’t make out the chip name fully you are probably fine. Flashrom will give you a list of around five possible chips and it is almost always one of the first two. You can simply test with each of flashrom’s suggested chip names until it works.
Step 1: Download my simple flash script and make it executable. The script requires whiptail for input dialogs. Whiptail is likely already installed if you use a modern linux distro, but you should make sure.
 wget 'https://github.com/shmalebx9/Bleeding-Libreboot/raw/master/flash' -O ~/.local/bin/flash
 chmod +x ~/.local/bin/flash
Step 2: Find your MAC address. It looks like this ‘00:24:7E:16:E3:81’ and will be written on a white label on the bottom of your machine.
Step 3: Run the flash command from your home directory. Make sure to pass the ‘-i’ flag so the script knows you are flashing internally (the default is external flashing). If you downloaded my roms and placed them in your libreboot directory you can simply follow the menus presented. If you didn’t download my roms from earlier you’ll have to run the command with the ‘-r’ flag.
flash -i or flash -i -r /path/to/rom
If you see ‘flash verified’ then you are done. If your flash is not verified, try again and DO NOT reboot. If you reboot after a failed flash you will not be able to boot until you flash externally again.