External Libreboot Flashing Guide
This is a general guide for flashing the read only memory (rom) of your laptop. This guide is specifically aimed at librebooting for the T400/T500/X200 but the process is basically the same for any coreboot machine. This guide also assumes that you are using a raspberry pi but you could use another board or ever the very cheap CH341A. I recommend against using the CH341A as it could brick your machine. I also recommend against using the BeagleBone Black as this requires you to purchase and use an external power supply. You can use a lot of different boards for librebooting but at the end of the day the raspberry pi is the obvious choice despite its shortcomings. You might already have a pi lying around (like me) and even if you don’t you can use it for various other cool projects in the future.
Setting up your Environment
This section will detail how to set up your environment to use the pi in a headless setup over wifi. This type of setup is the cheapest possible way to run as it does not require a keyboard, monitor, or ethernet cable.
Step 1: Download and write the Raspbian image to your sd/microsd card. Run ‘lsblk’ to find the path to your sd card if you don’t know.
sudo dd if=/path/to/raspbian.img of=/dev/SD bs=2M && sync
Now you can mount the sd card and enable ssh.
 sudo mkdir -p /media/pi && mount /dev/SD /media/pi
 touch /media/pi/boot/ssh
Step 2: Set up wifi by adding a wpa_supplicant config file to the /boot folder of your pi. Replace ‘US’ with your country code, ‘SSID’ with your wifi network name, and ‘PASSWORD’ with your wifi password.
country=US
ctrl_interface=DIR=/var/run/wpa_supplicant GROUP=netdev
update_config=1

network={
    ssid="SSID"
    psk="PASSWORD"
}
Step 2A: You can optionally set a static IP to make ssh easier. If you don’t know your networks gateway and netmask you should skip this step. You can always log in to your router and view the connected clients to find your pi’s ip address but by setting a static IP you will already know your pi’s ip. To set a static ip, edit the file /media/pi/etc/network/interfaces/wlan0. Change ‘dhcp’ to ‘static’ and then set your ip, network mask, and gateway according to this template:
iface wlan0 inet static

address 192.168.1.5
netmask 255.255.255.0
gateway 192.168.1.1
Step 2B: If you didn’t set your pi’s ip you need to find it on your local network. Plug in your pi with the SD card you prepared earlier and let it connect to the network. You can then view the clients connect to your local network by logging in to your router. Your router’s admin portal is almost always accessible by typing your router’s ip into the address bar of your browser. You can find your router’s ip by looking at your default gateway, for example
 ip route
default via 192.168.2.1 dev wlp2s0 proto dhcp src 192.168.2.108 metric 3003
192.168.2.0/24 dev wlp2s0 proto dhcp scope link src 192.168.2.108
metric 3003
You can see that my router’s ip is ‘192.168.2.1’
Step 3: Plug in your raspberry pi and test that ssh is working. If you’re using linux then you probably already have an ssh client installed but if not, install openssh. This guide will arbitrarily assume that your pi’s ip is ‘192.168.1.5.’ Depending on how your network is configured, you may be able to use ‘localhost’ instead of the full ip of your pi. The default username is ‘pi’ and the password is ‘raspberry.’
ssh pi@192.168.1.5
If everything is working you can now create and copy your ssh key to the pi so you won’t be prompted for a password in the future.
 ssh-keygen
 ssh-copy-id pi@192.168.1.5
Step 4: Now ssh to your pi, update, and install the necessary packages.
 ssh pi@192.168.1.5
 sudo apt-get update
 sudo apt-get dist-upgrade
 sudo apt-get install libftdi1 libftdi-dev libusb-dev libpci-dev subversion flashrom dialog
Step 5: You will need to set up some kernel modules and reboot. Thankfully, the raspberrypi engineers have created a tool called ‘raspi-config’ to make this process easy.
sudo raspi-config
You’ll see an ncurses interface to help set up your pi. Navigate through the menus to enable SPI, I2C, and optionally expand the filesystem. After this, reboot the pi.
Getting the Software
You’ll need several utilities installed on your system to be able to flash a rom. You will also -obviously- need the rom itself. The rest of this guides assumes that you are operating from a directory called ‘libreboot’ in your home directory.
 cd ~
 mkdir libreboot
You should also set up a local directory in your path. Doing this makes it easy to run binaries/scripts without installation/superuser privileges. Simply create the directory and add it to your PATH.
 mkdir -p ~/.local/bin
 echo "PATH=$PATH:$HOME/.local/bin" >> .bashrc
Step 1 Download, extract, and move the ich9gen binary into your PATH. You can also use several other utilities from the same archive, so you may as well leave it intact.
 cd ~/libreboot
 wget 'https://rsync.libreboot.org/stable/20160907/libreboot_r20160907_util.tar.xz'
 mkdir util
 tar xvf libreboot_r20160907_util.tar.xz -C util
 mv util/libreboot_r20160907_util/ich9deblob/armv7l/ich9gen ~/.local/bin
 chmod +x ~/.local/bin/*
Step1A: If you’re going to be flashing an x200 you should download the hackrom utility. Hackrom is a patched version of flashrom that allows you to use the ‘–workaround-mx’ flag.
 wget 'https://vimuser.org/hackrom.tar.xz'
 mv hackrom/flashrom ~/.local/bin/hackrom
Step 2: You can flash any rom you want with the utilities you now have installed. This guide assumes you’re using the libreboot builds from my github, by you can use any coreboot/libreboot/osboot build you want. Using my builds will greatly simplify the process going forward and also adds some important fixes to the roms themselves. Replace the download link with the latest release from the github releases. Make sure to get the “all” archive if you want more than just the usqwerty layout.
mkdir ~/libreboot/roms
cd ~/libreboot/
wget LATEST_RELEASE
tar xvf custom-all.tar.gz -C roms
Wiring up
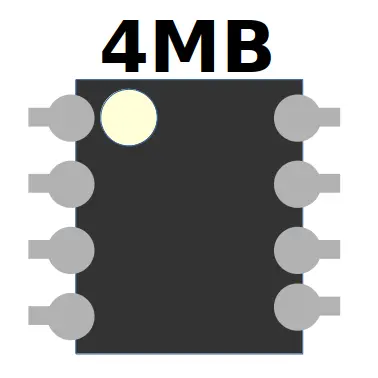
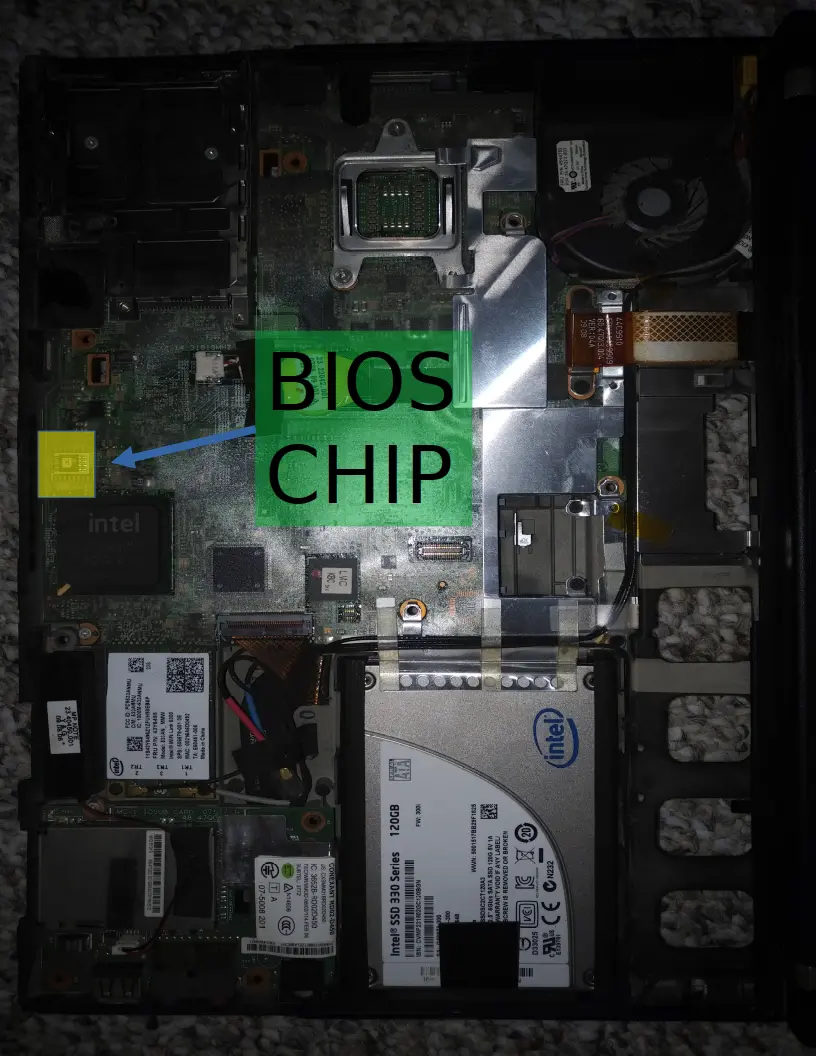
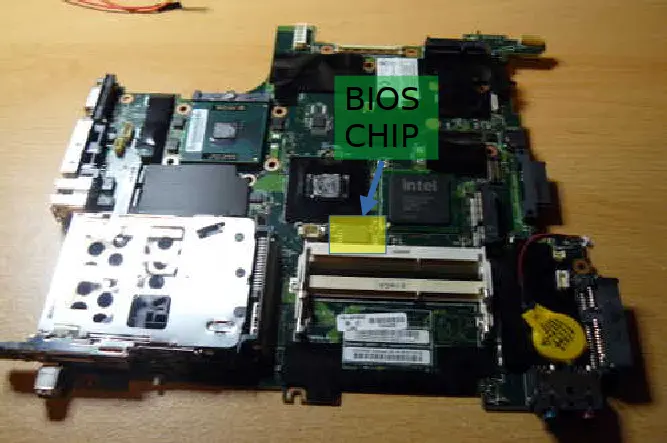
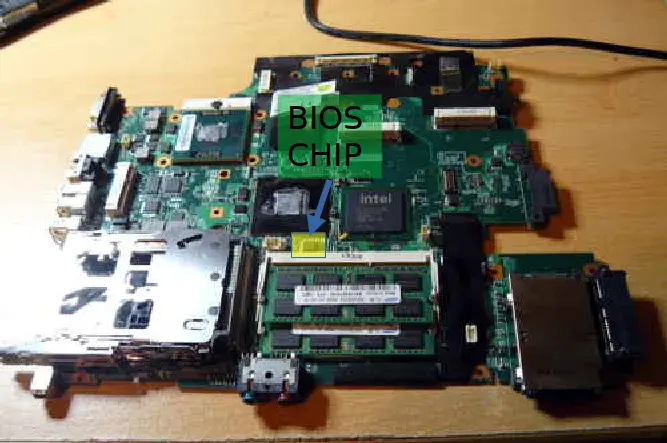
If you’ve gotten this far, you’ll now need to connect your wires (dupont cables) from the pi to your SOIC clip. Most thinkpads -including the T500, T400, and X200- have either an 4MB or 8MB bios chip which can be easily flashed with SOIC test clips. The way you wire up your chip depends on the size of the bios chip, not which machine or brand of chip you’re flashing. If your bios chip has 8 contacts then it’s a 4MB chip, if it has 16 contacts then it’s an 8MB chip; refer to the image if you’re unsure. The dot on the chip itself marks which contact is number 1; but you can always turn it around if it fails to read.
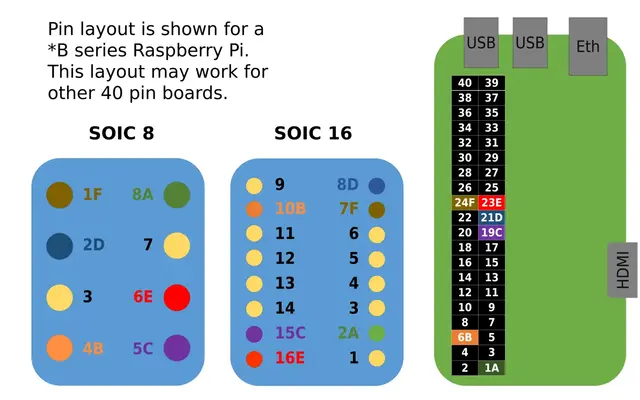
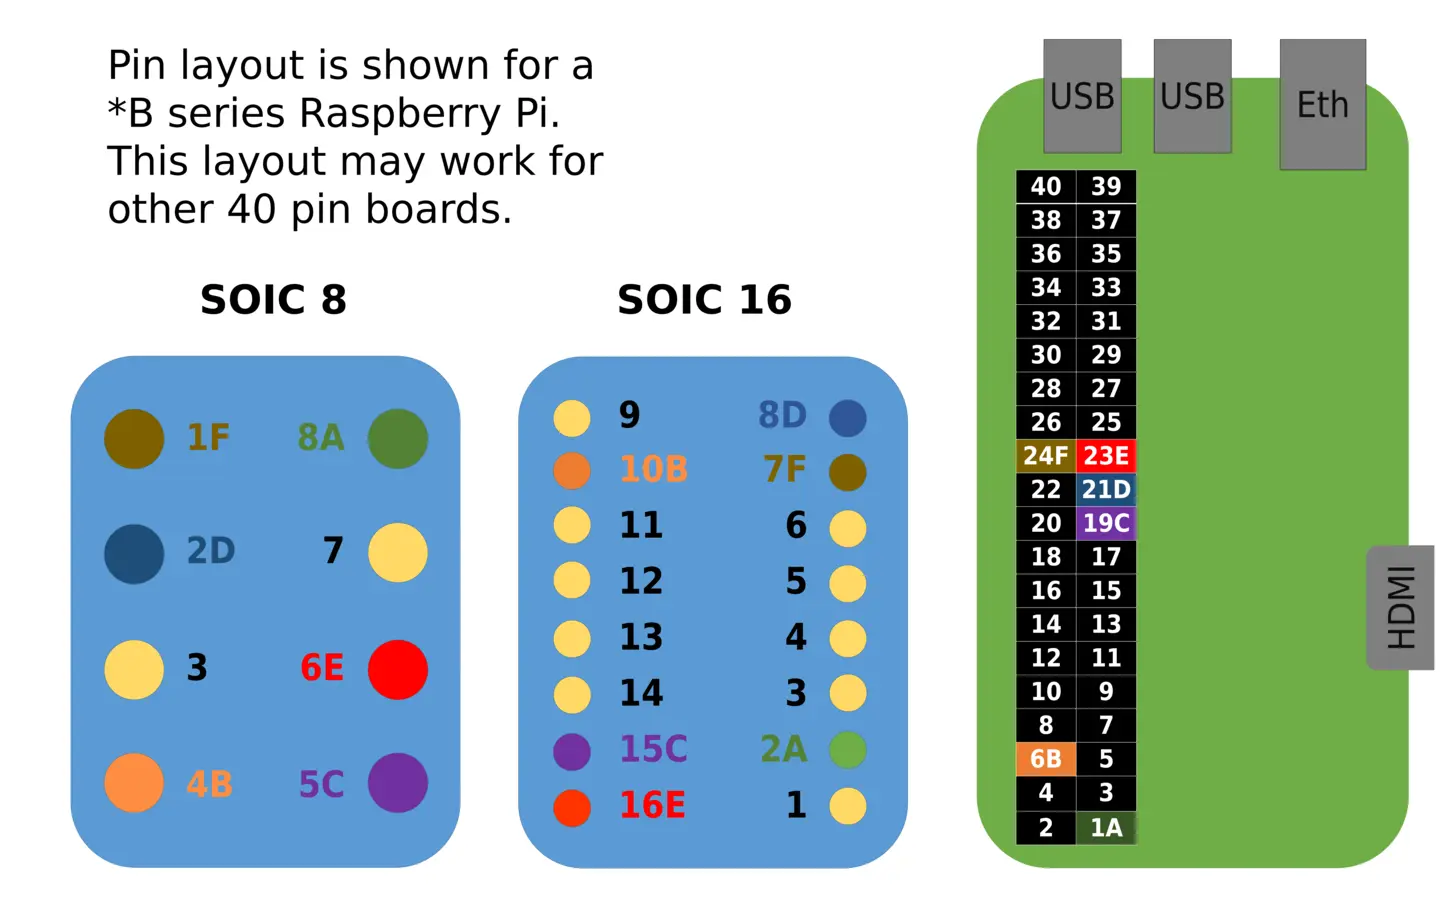
The images below will show you how to identify which chip you have, how to wire it up to the clip, and where to attach the clip to the bios chip.
  |
  |
  |
  |
  |
Flashing
Now you should have everything set up to manually flash the chip. I wrote a simple script which you can download and run. You’ll need to know the chip name and mac address for the machine you want to flash. You can find the chip name written on top of the chip, use a magnifying glass or your phone’s camera to get a better look at the chip. You may have to remove a small piece of tape on top of the chip to read it. If you can’t make out the chip name fully you are probably fine. Flashrom will give you a list of around five possible chips and it is almost always one of the first two. You can simply test with each of flashrom’s suggested chip names until it works.
Step 1: Download my simple flash script and make it executable. Note: this script is currently only set up to work with GM45 hardware, if you’re flashing something newer (x210,t410 or newer) then you need to manually flash as explained in the note at the end.
 wget 'https://github.com/shmalebx9/Bleeding-Libreboot/raw/master/flash' -O ~/.local/bin/flash
 chmod +x ~/.local/bin/flash
Step 2: Find your MAC address. It looks like this ‘00:24:7E:16:E3:81’ and will be written on a white label on the bottom of your machine. The automatic MAC address changer currently only works with GM45 hardware.
Step 3: Run the flash command from your home directory.
flash -r /path/to/rom
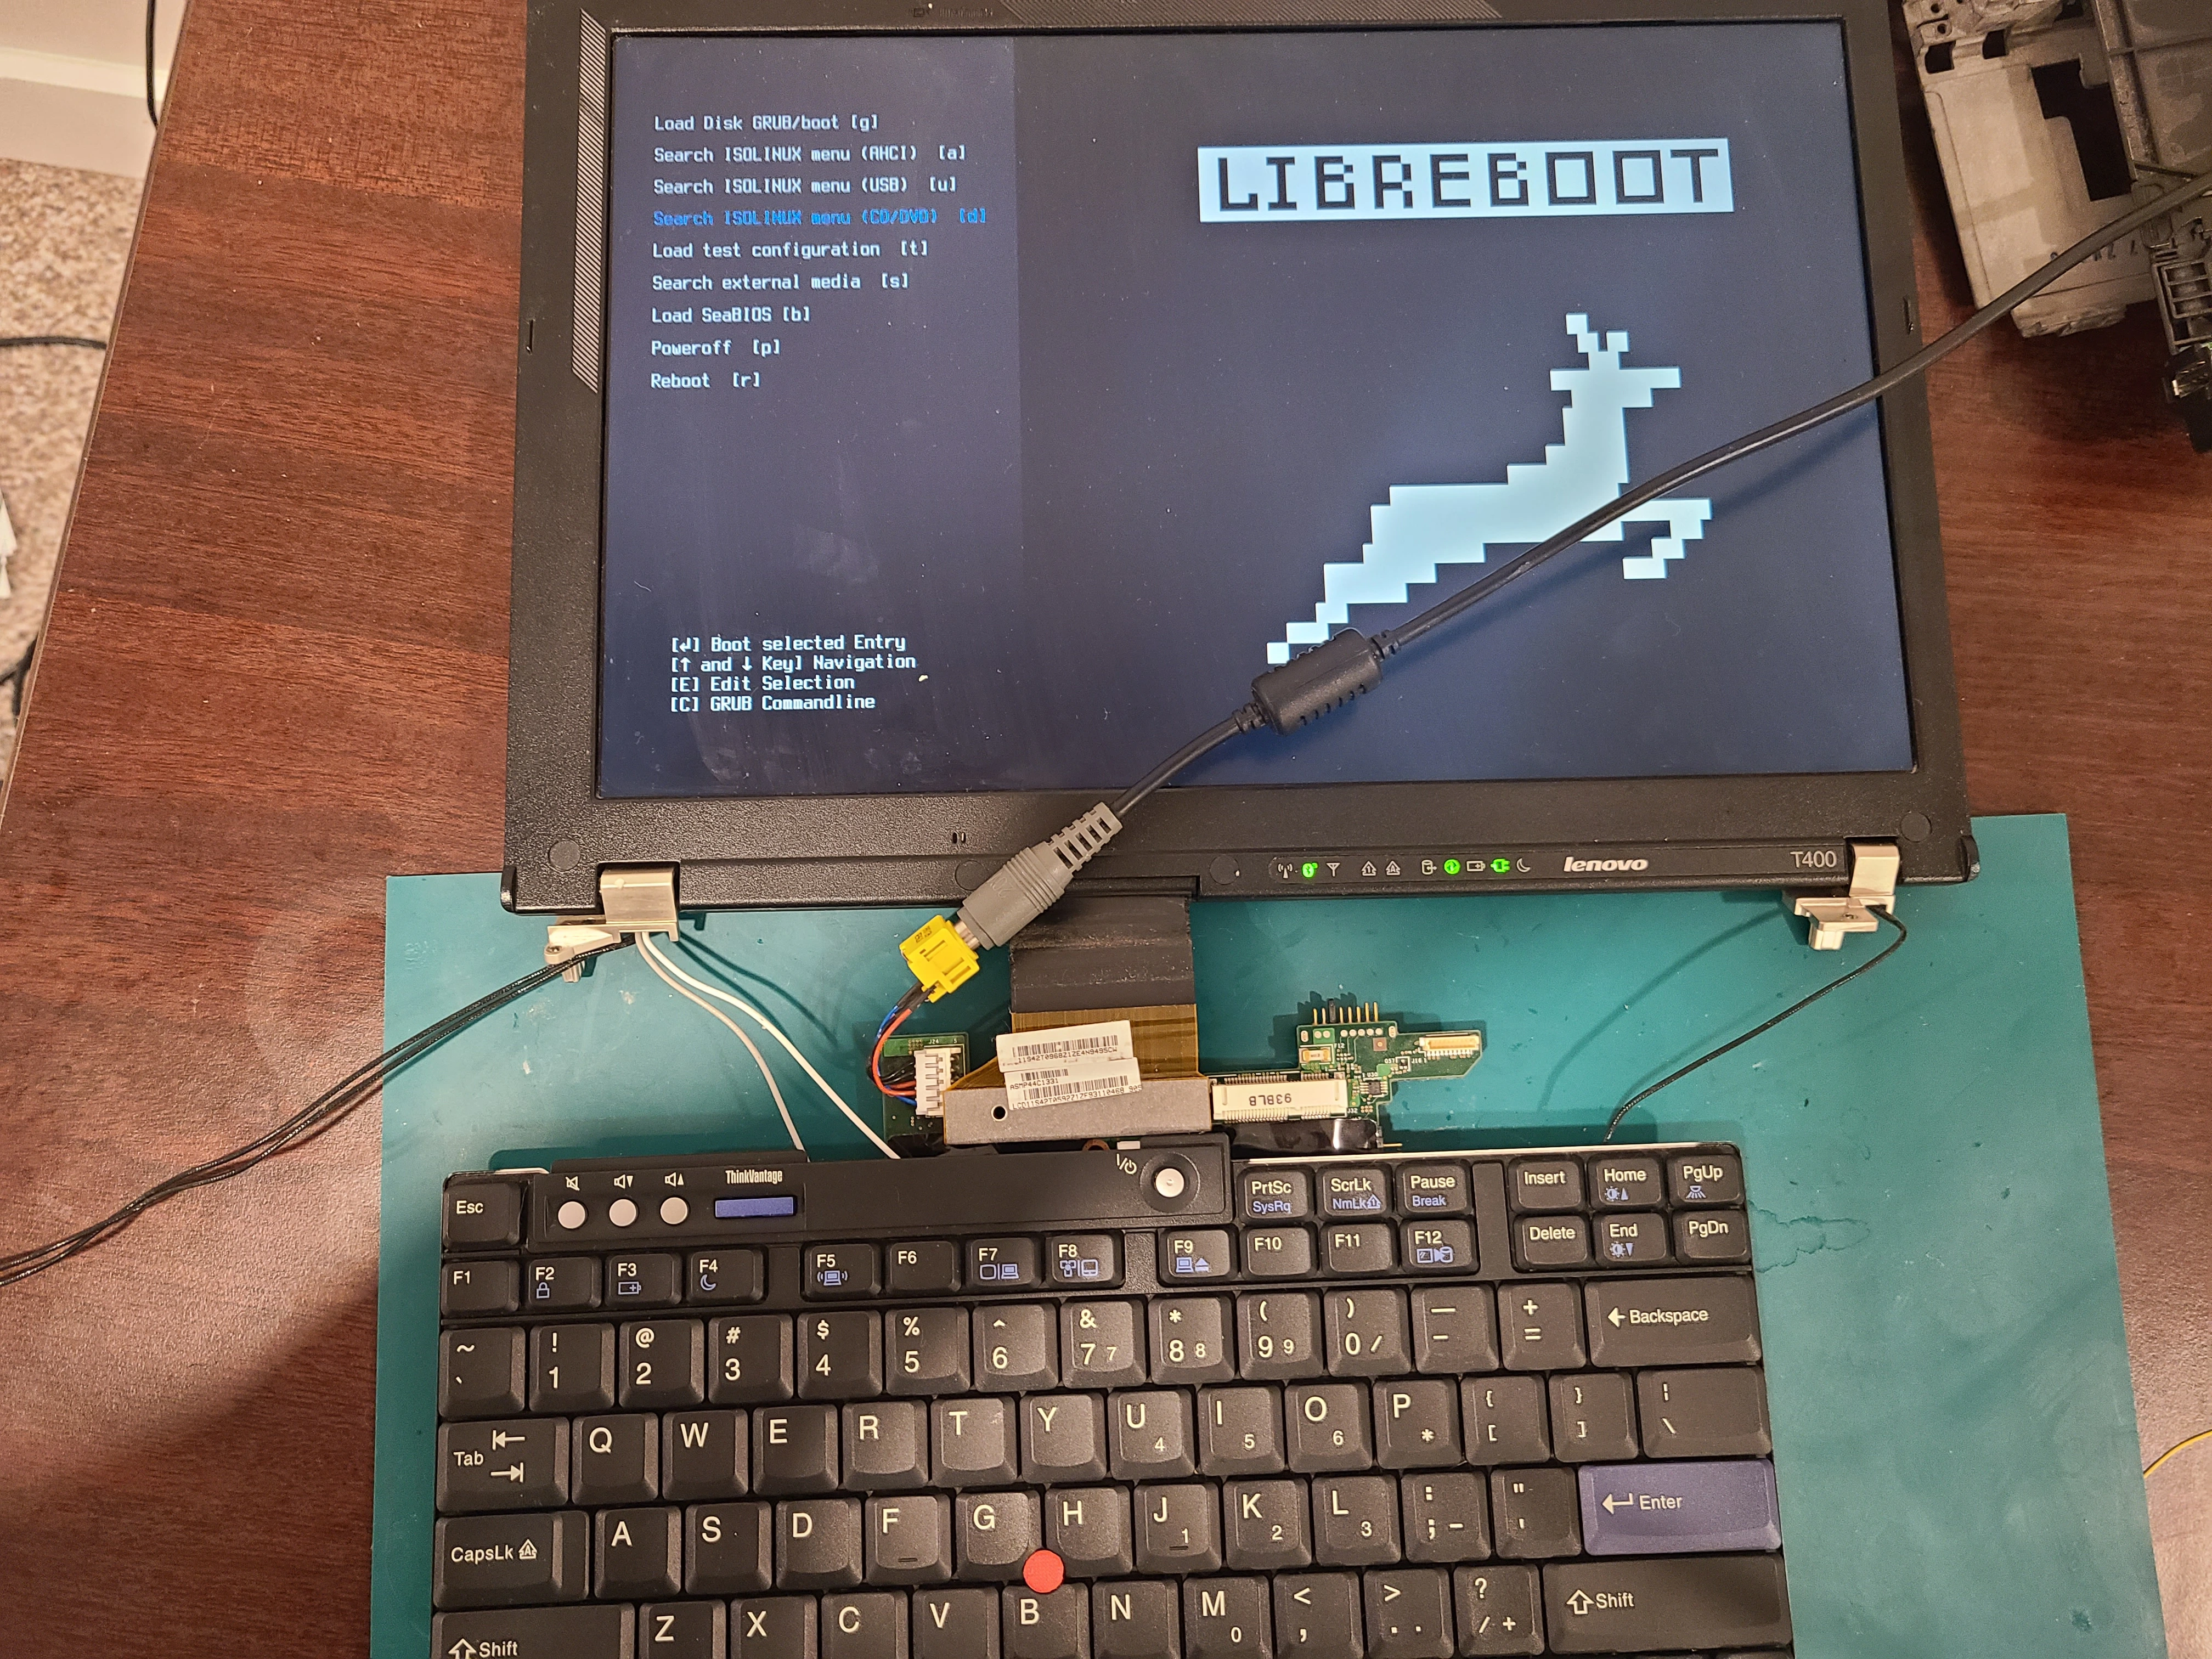
Step 4: Test if you’re flash was successful by attaching the screen, keyboard, and power. Press the on button and see if it boots. If everything went well, you should see the new bootsplash.

Note: If you face problems with my automatic flashing script you can always flash the rom manually. Make sure to make several backups of your vendor rom and check the hashes of the files to make sure they match if you go the manual route. The commands are:
flashrom -p linux_spi:dev=/dev/spidev0.0,spispeed=512 -r /path/to/backup # for reading
flashrom -p linux_spi:dev=/dev/spidev0.0,spispeed=512 -w /path/to/rom # for flashing