General Libreboot Notes
This little article is a companion to my full libreboot guides. It is intended to be a home for any details, notes, and tips I might find useful.
The General Order of Things
If you’re planning on flashing libreboot to your thinkpad you should know there are a few prerequisites. The order of operations should be:
- Update the EC firmware
- Make sure your RAM (memory) is compatible
- Install a compatible wirless card
- Flash libreboot
All of the steps to accomplish this are listed below.
Embedded Controlled (EC)
There are several pieces of firmware (sometimes stored on other chips) that are necessary to run your machine; these include:
- External GPUs
- EC (embedded controller) firmware
- HDD/SSD firmware
- NIC (ethernet controller)
- CPU microcode
- Sound card
- Webcam
- USB host controller
- WWAN firmware
The piece only piece of firmware on the mainboard of importance for libreboot is the embedded controller (EC) firmware. This firmware handles inputs from physical input devices to the machine (like keyboard buttons). Lenovo found a few bugs in its EC firmware and patched them. The update utilities released by Lenovo make it easy to update the EC firmware. The only issue is that all of these tools rely on the stock BIOS to actually perform the update. When you use their update tool, you update the BIOS, then the BIOS detects that an update has occurred, loads the new EC firmware and flashes it. All this means that once you flash libreboot, you’re stuck with the EC version that the machine had before flashing. Leah and other libreboot users therefore recommend update the EC before you flash libreboot. In fairness, the old EC is probably fine. You should still update however, because you might face issues in the future which you could have solved by just update the EC beforehand.
Lenovo provides two different EC update methods:
- A windows executable (exe)
- A bootable CD iso (iso)
The exe method obviously require a windows installation. You could go this route if the machine you’ve purchased from ebay already has windows, but you’ll of course have to deal with slow and annoying gatezware. Whichever method you choose, you’ll have to download a file from Lenovo’s site. Thinkwiki provides an easy download link for firmware but Lenovo sometimes changes their site for no reason, rendering these links useless. You can always just search ‘BIOS update {mymachine}’ and find the latest version on lenovo’s site. The windows exe method is obvious, so I’ll just explain the bootable CD route.
Lenovo distributes their BIOS update CD’s as isos for CD’s. You probably don’t have a CD anymore, and probably don’t want to use one. Thankfully, using a USB for this purpose is pretty easy.
Step 1: Download the latest BIOS update CD for you machine (*.iso). Just use the thinkwiki link or search as described above.
Step 2: Extract the bootable portion of the iso into an img file. You’ll need the program ‘geteltorito,’ which is likely in your distro’s repos. Tell the program the name of the img file you want, then point it the iso you downloaded in step 1.
geteltorito -o ecupdate.img myiso.iso
Step 3: Write the img file to your USB device. You could probably use a program like unetbootin. I personally use multibootusb to create a single USB drive with the BIOS update img for every thinkpad. You can simply use ‘dd’ to write to a single drive.
dd if=ecupdate.img of=/dev/sdb bs=4M status=progress && sync
Step 4: Reboot and select the USB you just created as the boot device. Pressing F12 at the Lenovo bootsplash will generally give you a boot device list to select your USB. Once everything boots up, you’ll see a screen giving you a few options, select 2 update the system program.
Step 5: Follow the onscreen instructions. Let the program update your BIOS and EC. This process may take a few reboots, so wait patiently. Once your machine boots to the disk, you know the EC is updated. If you want to be sure, you can hit F1 at the bootsplash and look for your EC version on the main screen.
You might notice that the EC/BIOS update will fail if you don’t have a charged battery and a power connection. These are simply failsafe measures to prevent you from bricking your device (by an incomplete update). You should let your battery charge and plug in to power before running the update utility.
Wifi Cards
The stock intel wifi cards you’ll find in your machine won’t work after librebooting. The intel cards require specific blobs that won’t be included in the new ROM. You therefore have to make sure to purchase a FOSS compatible wifi card. There are a few sellers who make cards specifically for this purpose, but they’re prohibitively expensive and not necessary. In general most Atheros mini PCI express cards cards will work. You might get lucky pulling a card from an old machine, in which case you can check the trisquel forums to ask if it’s compatible. In case you don’t have an extra card, here’s a list of likely compatible cards:
| Card | Source |
|---|---|
| Atheros AR5B95 | Trisquel forums. 150Mbps |
| Atheros AR5B22 | This is the card I always use. 300Mbps |
| Atheros AR5BHB116 | Trisquel forums. 300Mbps |
| Atheros AR5BXB112 | Trisquel forums. 450Mbps |
As you can see, some of these cards are faster than others (none are 802.11ac). I wouldn’t worry about the specs, there is almost no chance you’ll ever run into internet fast enough for the card to be a bottleneck. You should also note that some of these cards support bluetooth. The bluetooth feature will not work with libreboot (needs blobs).
I recommend disregarding all the supposed features of the cards and just shopping by price. You may be able to find some of these for around ten bucks.
Memory
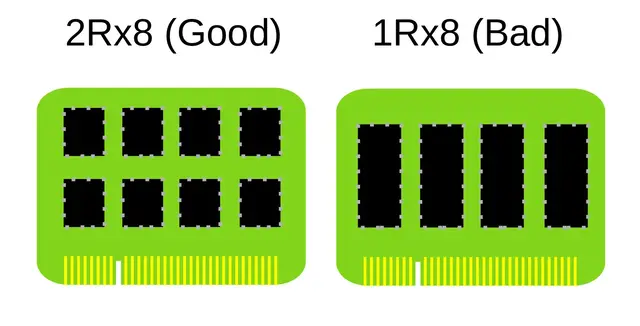
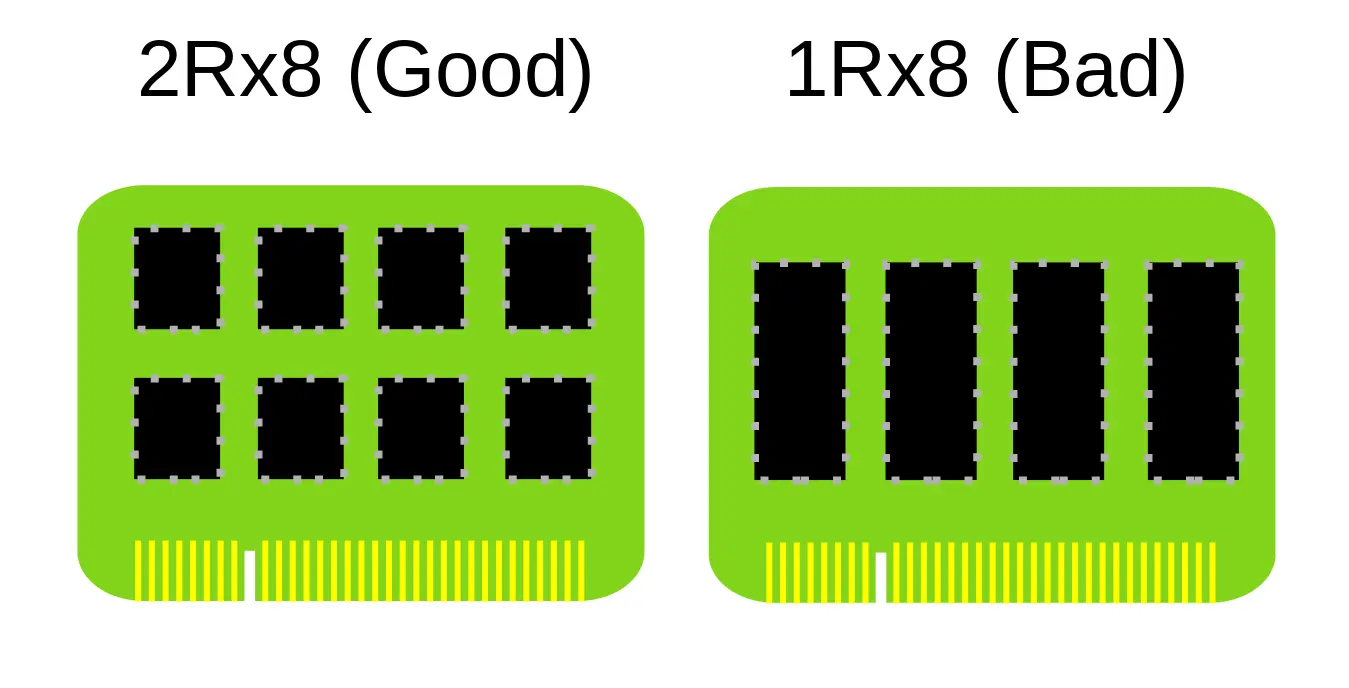
Libreboot will be very picky about the RAM you can use in the system. If you try to boot up and hear a beeping and/or see only a black screen then chances are that your memory doesn’t work. In general, dual rank memory (2Rx*) will work whereas single rank memory (1Rx*) won’t. The two are easily visually distinguishable. 2rx* has two rows of chips whereas 1Rx* has a single row.
Additionally, each slot can hold 2GB or 4GB stick for a max of 8GB. You cannot use a single 8GB stick! These are all hardware limitations of the ’00 series thinkpads.
The machine will almost always boot with the stock 2GB RAM module(s). Here’s my list of likely supported ram sticks.
| RAM stick | Source |
|---|---|
| Crucial CT51264BF160B (4GB) | Self tested. |
| Hynix HMT351S6CFR8C (4GB) | Self tested. |
| Kuesuny (4GB) | Self tested. |
I’ve never found a 2Rx8 stick that didn’t work though. I would just shop by price.